How to import on-premises Virtual Machine (VM) to AWS EC2
Table of contents
- 1. Scenario
- 2. Import Steps
- Side Note - Import and launch Windows 10 in AWS EC2
- Side Note - Import and launch Windows 11 in AWS EC2
- References
Scenario
There are times when we would like to launch VM/EC2 and that particular VM is not available as AMI in AWS EC2. Possible use cases such as:
- Bring in your on-premises Virtual Machine to AWS EC2.
- Launch obsolete/outdated OS, such as Windows Server 2012 R2.
- Launch client OS, like running Windows 10 or 11 in AWS EC2.
Import Steps
1. Create / prepare / download Virtual Harddisk of the target VM
Some options that we can use.
- Windows Server 2012 R2 > select
VHD download - Evaluation Center - registration required
2. Pre-requisites
- AWS Account
- Install and configure AWS CLI v2
- Budget of about ~USD2.00 for AWS spending (your mileage may vary)
3. Upload Virtual Harddisk to S3
-
Create new S3 Bucket
If you want to use existing bucket, you can skip this step.# Create S3 Bucket aws s3 mb s3://<UNIQUE_BUCKET_NAME> --region ap-southeast-1 # Add tags to S3 Bucket aws s3api put-bucket-tagging --region ap-southeast-1 --bucket <UNIQUE_BUCKET_NAME> --tagging "TagSet=[{Key=CostCenter, Value=EC2 Import Demo},{Key=Department, Value=Infra}]"Notes:
- Change the bucket name - s3 bucket name must be unique (not only unique in your account).
- Ensure that Block public access is enabled on the bucket.
-
Upload Virtual Harddisk to S3 Bucket
 # Upload file to S3 Bucket
 aws s3 cp --region ap-southeast-1 "C:\PATH_TO_YOUR_WINDOWS_VM\9600.16415.amd64fre.winblue_refresh.130928-2229_server_serverdatacentereval_en-us.vhd" s3://<UNIQUE_BUCKET_NAME>/win2012r2-9600.16415.vhd
While waiting for the upload, proceed to next step.
4. Create IAM Role for EC2 Import Task
-
Create IAM role from AWS CLI.
-
Create trust policy json file, save to your local disk -
trust-policy.json.{ "Version": "2012-10-17", "Statement": [ { "Effect": "Allow", "Principal": { "Service": "vmie.amazonaws.com" }, "Action": "sts:AssumeRole", "Condition": { "StringEquals":{ "sts:Externalid": "vmimport" } } } ] } - Create IAM Role -
team99-vmimport-role.aws iam create-role --role-name team99-vmimport-role --assume-role-policy-document "file://C:\PATH_TO_YOUR_FILE\trust-policy-vmimport.json" - Create role policy file -
role-policy.json.{ "Version": "2012-10-17", "Statement": [ { "Effect": "Allow", "Action": [ "s3:GetBucketLocation", "s3:GetObject", "s3:ListBucket" ], "Resource": [ "arn:aws:s3:::<UNIQUE_BUCKET_NAME>", "arn:aws:s3:::<UNIQUE_BUCKET_NAME>/*" ] }, { "Effect": "Allow", "Action": [ "s3:GetBucketLocation", "s3:GetObject", "s3:ListBucket", "s3:PutObject", "s3:GetBucketAcl" ], "Resource": [ "arn:aws:s3:::<UNIQUE_BUCKET_NAME>", "arn:aws:s3:::<UNIQUE_BUCKET_NAME>/*" ] }, { "Effect": "Allow", "Action": [ "ec2:ModifySnapshotAttribute", "ec2:CopySnapshot", "ec2:RegisterImage", "ec2:Describe*" ], "Resource": "*" }, { "Effect": "Allow", "Action": [ "license-manager:GetLicenseConfiguration", "license-manager:UpdateLicenseSpecificationsForResource", "license-manager:ListLicenseSpecificationsForResource" ], "Resource": "*" } ] } - Attach role policy to IAM Role.
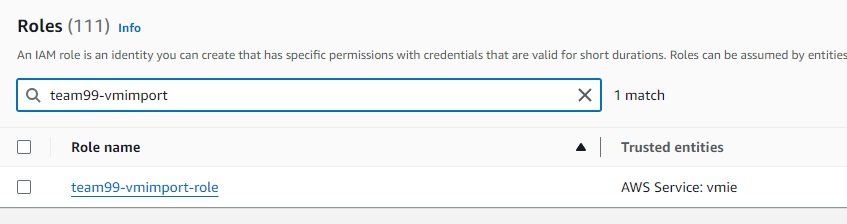
aws iam put-role-policy --role-name team99-vmimport-role --policy-name s3bucket-read-write-import --policy-document "file://C:\PATH_TO_YOUR_FILE\role-policy.json" - Open the IAM console at https://console.aws.amazon.com/iam/.
-
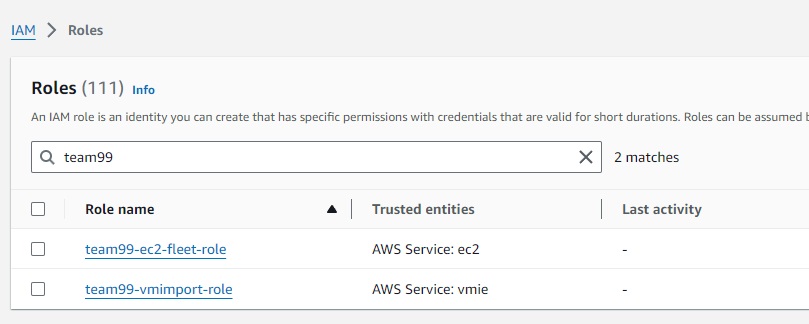
In the navigation pane, choose Roles.
-
5. Create EC2 AMI from Virtual Harddisk
-
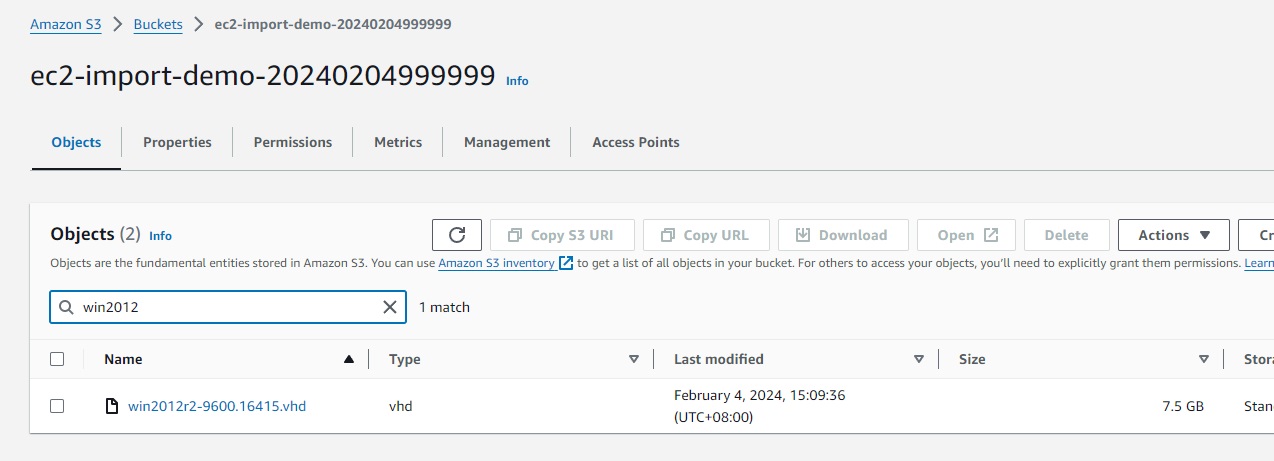
Wait for upload progress to complete. Once upload completed, check the harddisk in S3 bucket.
-
Create container manifest file in your local disk -
ec2-containers.json[ { "Description": "hvwindows2012r2", "Format": "vhd", "Url": "s3://<UNIQUE_BUCKET_NAME>/win2012r2-9600.16415.vhd" } ] -
Perform import task from CLI.
aws ec2 import-image --region ap-southeast-1 --description "Windows 2012 R2" --disk-containers "file://C:\PATH_TO_CONTAINER_FILE\ec2-containers.json" --role-name "team99-vmimport-role" --tag-specifications ResourceType=import-image-task,Tags=[{Key=Name,Value=win2012r2-ec2-image},{Key=CostCenter,Value="EC2 Import Demo"},{Key=Department,Value=Infra}]Sample output.
{ "Description": "Windows 2012 R2", "ImportTaskId": "import-ami-0e00aabd6fb70e2d5", "Progress": "1", "SnapshotDetails": [ { "Description": "hvwindows2012r2", "DiskImageSize": 0.0, "Format": "VHD", "Url": "s3://ec2-import-demo-20240204999999/win2012r2-9600.16415.vhd", "UserBucket": { "S3Bucket": "ec2-import-demo-20240204999999", "S3Key": "win2012r2-9600.16415.vhd" } } ], "Status": "active", "StatusMessage": "pending", "Tags": [ { "Key": "Name", "Value": "win2012r2-ec2-image" }, { "Key": "CostCenter", "Value": "EC2 Import Demo" }, { "Key": "Department", "Value": "Infra" } ] } -
This process will take quite some time (roughly 20-30 mins for Windows 2012 R2 import task). To check progress, grab the
ImportTaskIdand enter thedescribe-import-image-taskscommand.> aws ec2 describe-import-image-tasks --region ap-southeast-1 --import-task-ids import-ami-0e00aabd6fb70e2d5 { "ImportImageTasks": [ { "Description": "Windows 2012 R2", "ImportTaskId": "import-ami-0e00aabd6fb70e2d5", "Progress": "19", "SnapshotDetails": [ { "Description": "hvwindows2012r2", "DiskImageSize": 8024756224.0, "Format": "VHD", "Status": "active", "Url": "s3://ec2-import-demo-20240204999999/win2012r2-9600.16415.vhd", "UserBucket": { "S3Bucket": "ec2-import-demo-20240204999999", "S3Key": "win2012r2-9600.16415.vhd" } } ], "Status": "active", "StatusMessage": "converting", "Tags": [ { "Key": "CostCenter", "Value": "EC2 Import Demo" }, { "Key": "Department", "Value": "Infra" }, { "Key": "Name", "Value": "win2012r2-ec2-image" } ] } ] }Notable Progress - StatusMessage:
Progress Status 1 pending 19 converting 39 booting 57 preparing ami 100 completed -
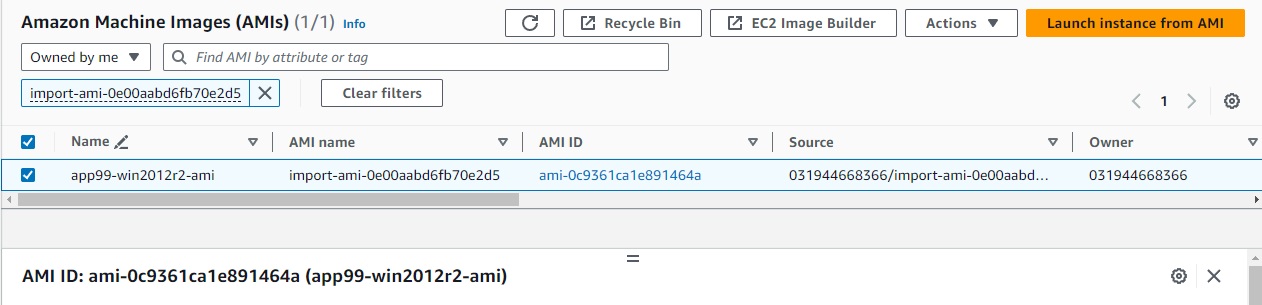
When the import process is completed, you can see the AMI in your AWS EC2 console - in the region that you specified.
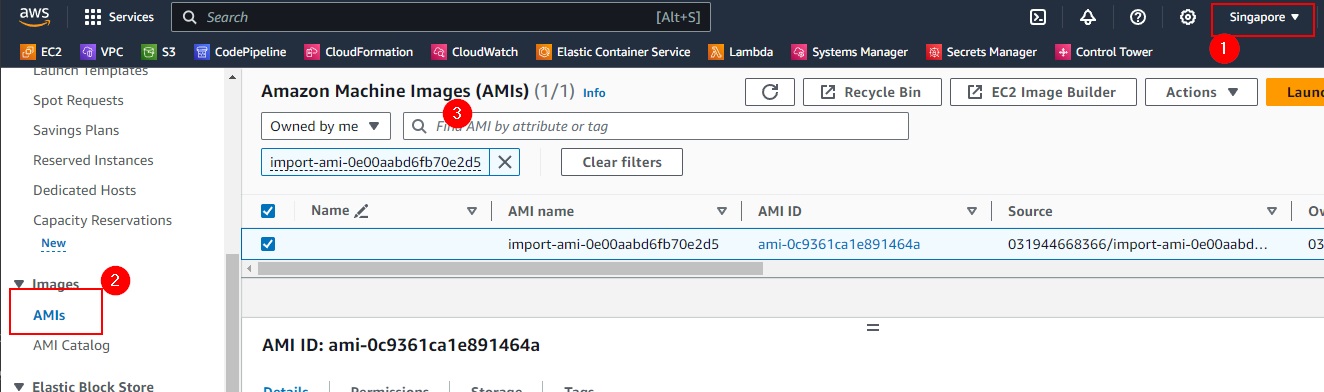
Name it to something that you can identify later, e.g.
app99-win2012r2-amiNotes:
- Each AMI will also come with Storage in the form of EC2 Snapshots.
- To verify Snapshots used by AMI, check on AMI > Storage tab.
- To cancel import task, use
ec2 cancel-import-task.aws ec2 cancel-import-task --region ap-southeast-1 --import-task-id import-ami-0124aff44c9b3411f
6. Launch EC2 from the AMI
-
Create IAM Instance Profile to use SSM Fleet Manager.
- Open the IAM console at https://console.aws.amazon.com/iam/.
- In the navigation pane, choose Roles, and then choose Create role.
- For Trusted entity type, choose AWS service.
- Immediately under Use case, choose EC2, and then choose Next.
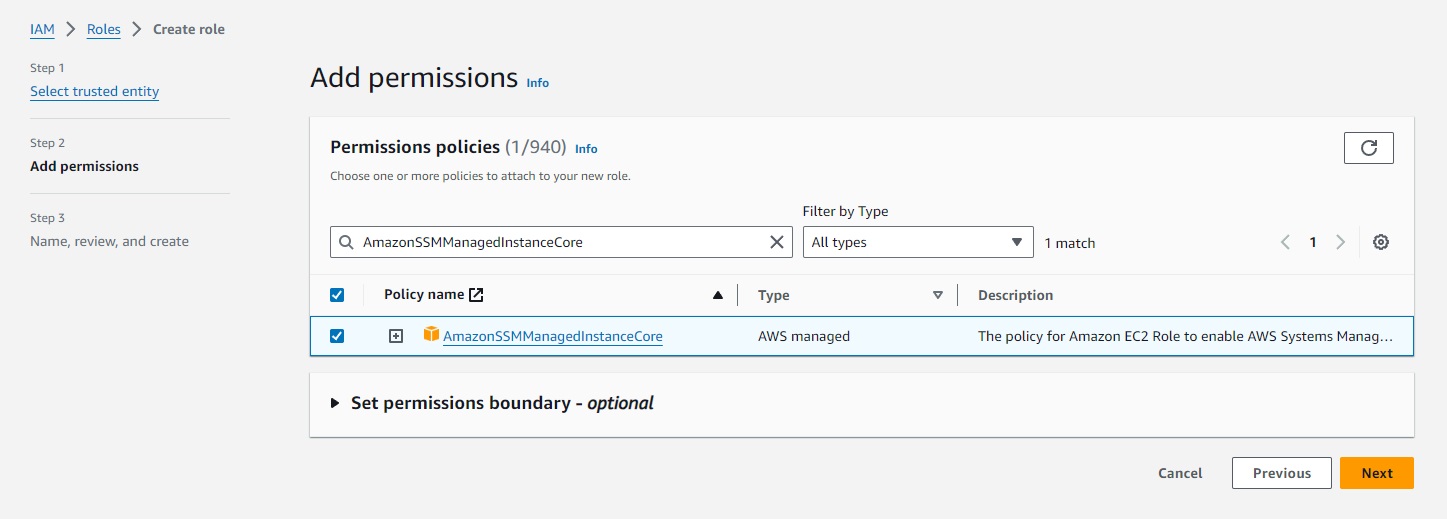
- On the Add permissions page, do the following:
- Use the Search field to locate the AmazonSSMManagedInstanceCore policy. Select the check box next to its name.
- If you plan to join instances to an Active Directory managed by AWS Directory Service, search for AmazonSSMDirectoryServiceAccess and select the check box next to its name.
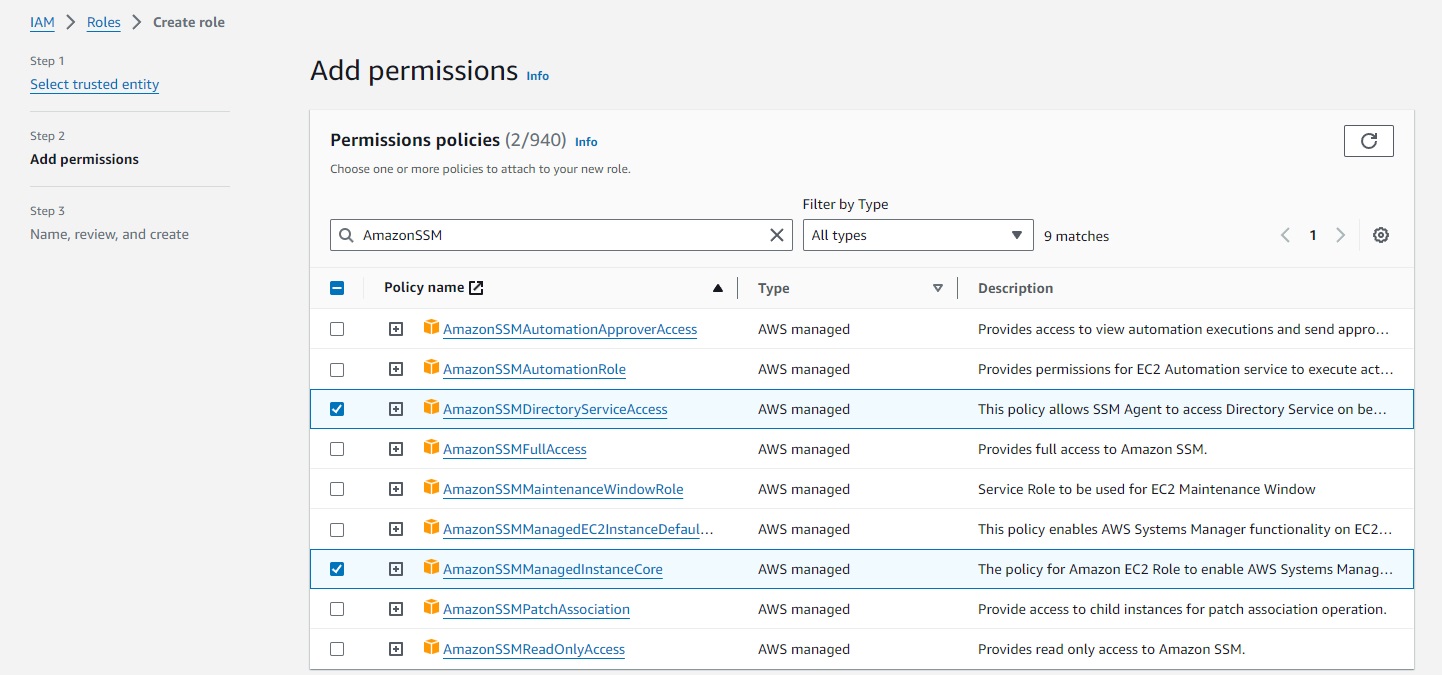
- If you plan to use EventBridge or CloudWatch Logs to manage or monitor your instance, search for CloudWatchAgentServerPolicy and select the check box next to its name.
- Use the Search field to locate the AmazonSSMManagedInstanceCore policy. Select the check box next to its name.
- Choose Next.
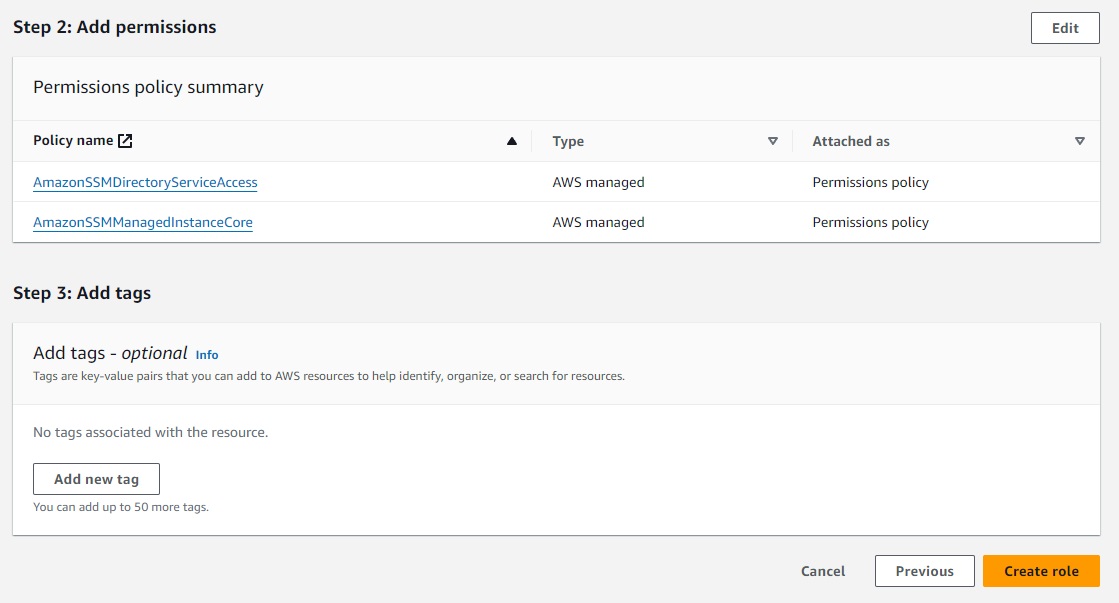
- For Role name, enter a name for your new instance profile, such as
team99-ec2-fleet-role. Then choose Create role. The system returns you to the Roles page.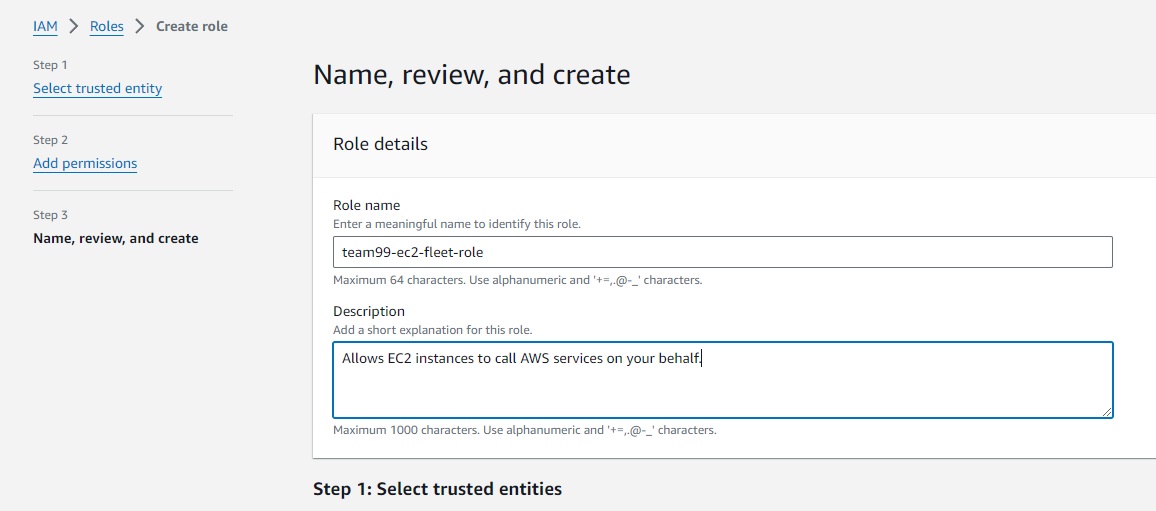
Alternative method - Create IAM Instance Profile using CLI
- Create trust policy file in your local disk -
trust-policy-ec2.json.{ "Version": "2012-10-17", "Statement": [ { "Sid": "", "Effect": "Allow", "Principal": { "Service": "ec2.amazonaws.com" }, "Action": "sts:AssumeRole" } ] } - Execute below command.
 # Create IAM Role
 aws iam create-role --role-name team99-ec2-fleet-role --assume-role-policy-document "file://C:\PATH_TO_YOUR_FILE\trust-policy-vmimport.json"

 # Attach AmazonSSMManagedInstanceCore policy
 aws iam attach-role-policy --policy-arn arn:aws:iam::aws:policy/AmazonSSMManagedInstanceCore --role-name team99-ec2-fleet-role

 # Attach AmazonSSMDirectoryServiceAccess policy
 aws iam attach-role-policy --policy-arn arn:aws:iam::aws:policy/AmazonSSMDirectoryServiceAccess --role-name team99-ec2-fleet-role

 # Create IAM instance profile
 aws iam create-instance-profile --instance-profile-name team99-ec2-fleet-instance-profile

 # Add instance profile to IAM Role
 aws iam add-role-to-instance-profile --instance-profile-name team99-ec2-fleet-instance-profile --role-name team99-ec2-fleet-role
-
Create EC2 Security Group in default VPC - name it
team99-ec2-importdemo-sg. Leave inbound rules empty and outbound rules as-is. We will be using Fleet Manager to RDP to the VM. No inbound rules is required.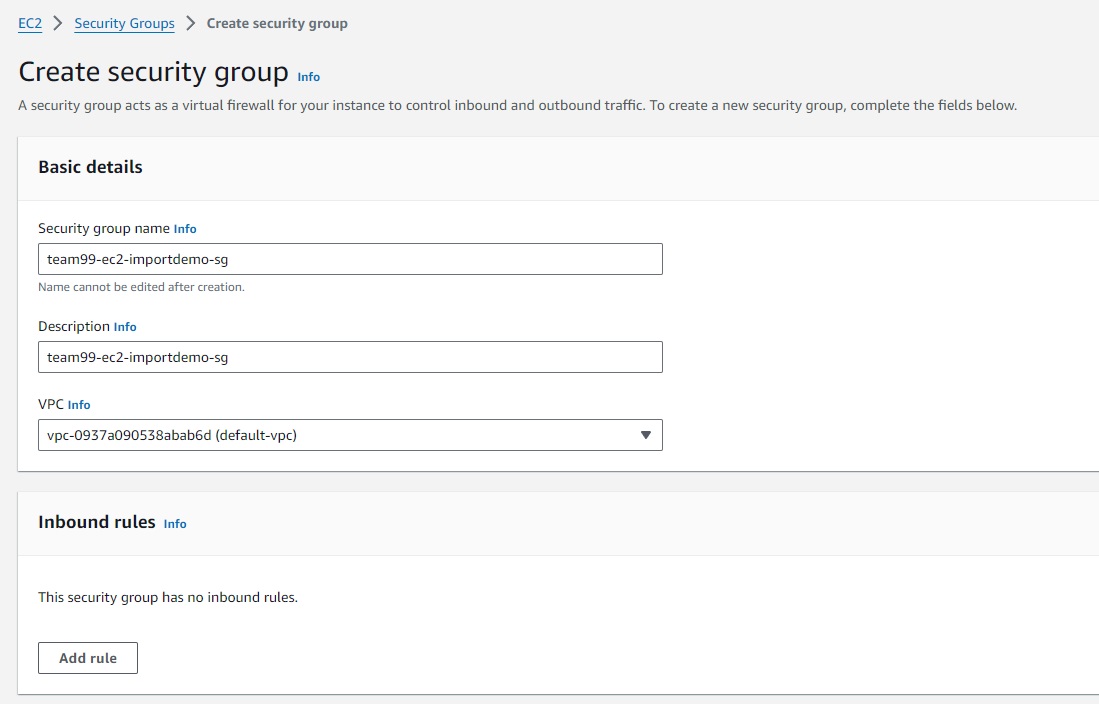
-
From AMIs > Owned by me > select the newly created AMI and click Launch instance from AMI.
- Enter EC2 name, e.g.
app99-demo-win2012r2-ec2. - Select instance type, like
m6a.large. - For key pair, select
Proceed without a key pair. - Select default VPC with public subnet (public IP will be required).
- Select existing security group that was created earlier -
team99-ec2-importdemo-sg. - Select
gp3storage type. - Expand Advanced details, select
team99-ec2-fleet-rolefor IAM instance profile. - (Optional) In user data textbox, enter.
<script> net user Administrator /active:yes </script> - Leave the rest as-is, click Launch instance.
- Enter EC2 name, e.g.
-
After EC2 is ready, click Connect > Session Manager tab > Connect. This will open session terminal in browser. Enter this to reset password for Administrator.
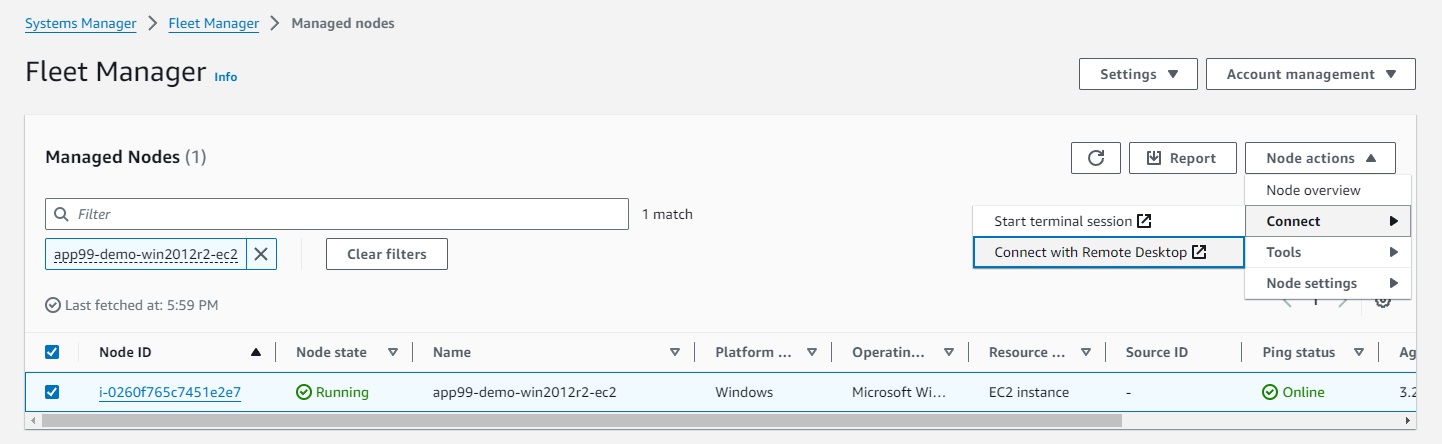
net user Administrator Some-Random-Password-Here - Navigate to Systems Manager > Fleet Manager in your selected region.
- Connect with Remote Desktop.
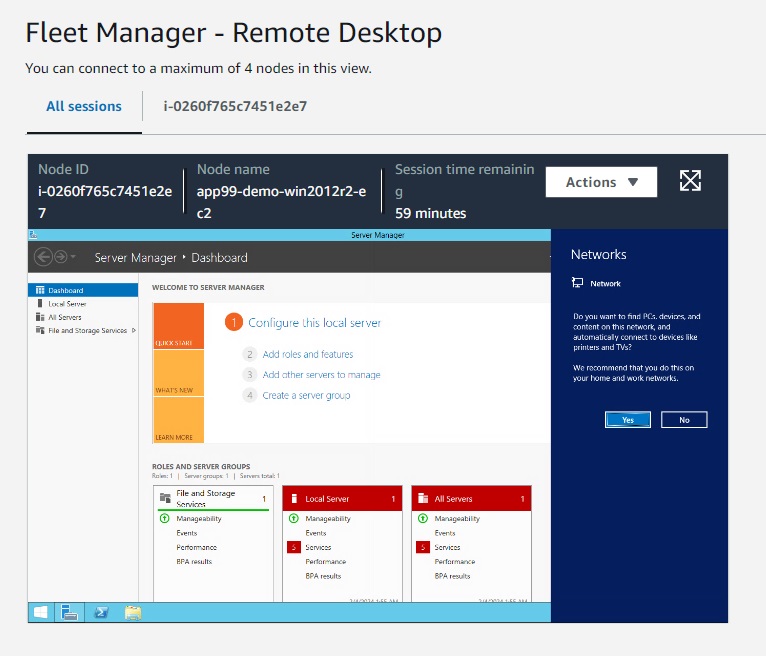
- Enter
Administratorfor username. - Enter password that you specified earlier.
- Click Connect.
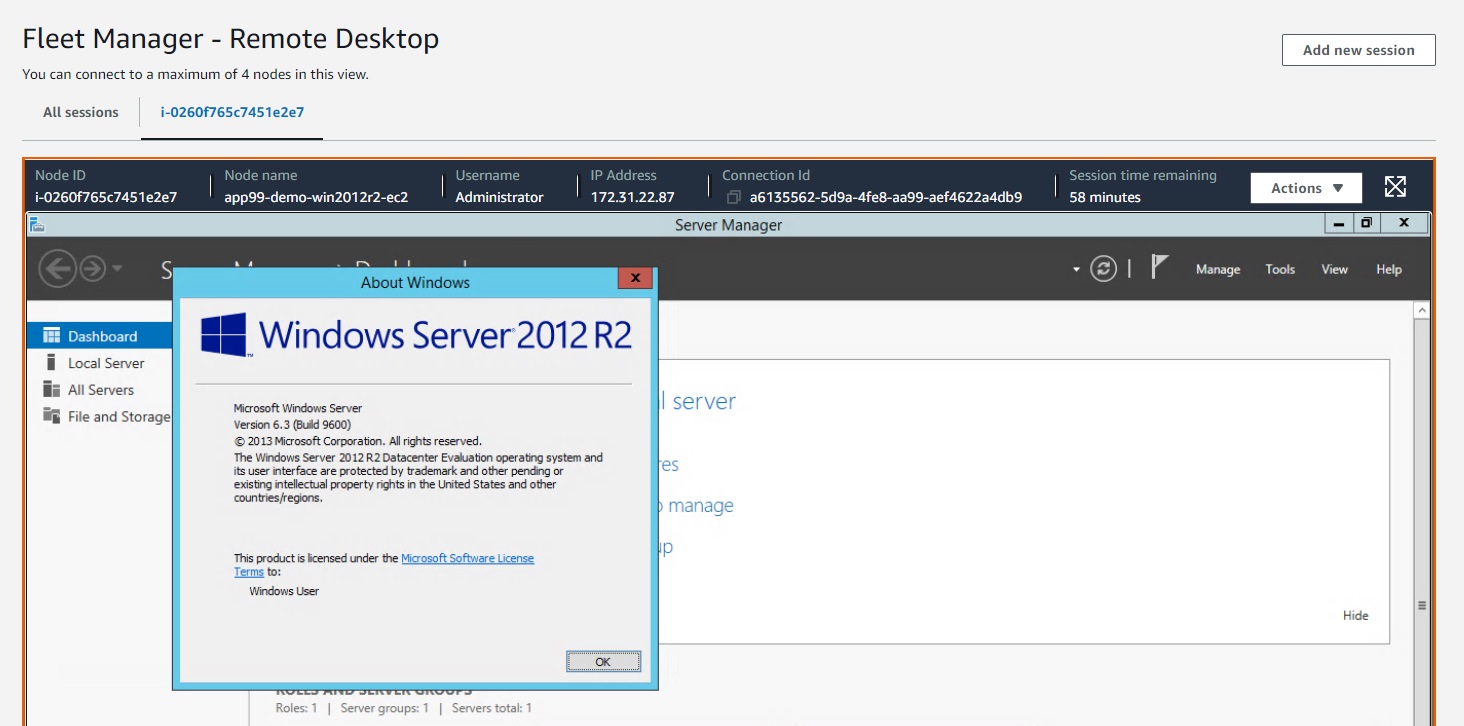
- Connect with Remote Desktop.
- Terminate the instance once you are done.
7. Cleanup
To ensure that you won’t be charged for any further usage, delete all the following resources.
- Delete all Virtual harddisk files you have uploaded in S3 Bucket.
- Delete the S3 bucket.
- Terminate EC2 instances (EC2 > Instances).
- Delete any EBS volumes that are not deleted when EC2 instances are terminated (EC2 > Volumes).
- Deregister AMI (EC2 > AMIs > Select AMI and deregister it).
- Delete snapshots associated with the AMI (EC2 > Snapshots > find the snapshot and delete it).
Side Note - Import and launch Windows 10 in AWS EC2
- Download old Windows 10 virtual harddisk from Archive.
- VMWare https://download.microsoft.com/download/b/7/a/b7a6fb6e-cae1-4e19-9249-205803bc4ada/WinDev2004Eval.VMware.zip
- VirtualBox https://download.microsoft.com/download/2/d/2/2d2f760e-aaa7-4268-9904-b5c0260cfd3b/WinDev2004Eval.VirtualBox.zip
-
Upload virtual harddisk to S3 bucket.
aws s3 cp --region ap-southeast-1 "C:\PATH_TO_YOUR_WINDOWS_VM\WinDev2004Eval-disk1.vmdk" s3://<UNIQUE_BUCKET_NAME>/WinDev2004Eval-disk1.vmdk -
Create container manifest file in your local disk -
ec2-containers.json[ { "Description": "win10devtest", "Format": "vmdk", "Url": "s3://<UNIQUE_BUCKET_NAME>/WinDev2004Eval-disk1.vmdk" } ] -
Perform import task from CLI.
aws ec2 import-image --region ap-southeast-1 --description "Windows 10 Dev 2004" --disk-containers "file://C:\PATH_TO_CONTAINER_FILE\ec2-containers.json" --role-name "team99-vmimport-role" --tag-specifications ResourceType=import-image-task,Tags=[{Key=Name,Value=win10-ec2-image},{Key=CostCenter,Value="EC2 Import Demo"},{Key=Department,Value=Infra}]Sample output.
{ "Description": "Windows 10 Dev 2004", "ImportTaskId": "import-ami-015a33ba399ae37a9", "Progress": "1", "SnapshotDetails": [ { "Description": "win10devtest", "DiskImageSize": 0.0, "Format": "VMDK", "Url": "s3://ec2-import-demo-20240204999999/WinDev2004Eval-disk1.vmdk", "UserBucket": { "S3Bucket": "ec2-import-demo-20240204999999", "S3Key": "WinDev2004Eval-disk1.vmdk" } } ], "Status": "active", "StatusMessage": "pending", "Tags": [ { "Key": "Name", "Value": "win10-ec2-image" }, { "Key": "CostCenter", "Value": "EC2 Import Demo" }, { "Key": "Department", "Value": "Infra" } ] } -
This process will take quite some time. To check progress, grab the
ImportTaskIdand enter thedescribe-import-image-taskscommand.> aws ec2 describe-import-image-tasks --region ap-southeast-1 --import-task-ids import-ami-015a33ba399ae37a9 { "ImportImageTasks": [ { "Description": "Windows 10 Dev 2004", "ImportTaskId": "import-ami-015a33ba399ae37a9", "Progress": "19", "SnapshotDetails": [ { "Description": "win10devtest", "DiskImageSize": 19020283392.0, "Format": "VMDK", "Status": "active", "Url": "s3://ec2-import-demo-20240204999999/WinDev2004Eval-disk1.vmdk", "UserBucket": { "S3Bucket": "ec2-import-demo-20240204999999", "S3Key": "WinDev2004Eval-disk1.vmdk" } } ], "Status": "active", "StatusMessage": "converting", "Tags": [ { "Key": "CostCenter", "Value": "EC2 Import Demo" }, { "Key": "Department", "Value": "Infra" }, { "Key": "Name", "Value": "win11-ec2-image" } ] } ] } - When the import process is completed, check the AMI in your AWS EC2 console - in the region that you specified. Name it to something that you can identify later, e.g.
app99-win10dev-ami - Launch EC2 from the AMI. From AMIs > Owned by me > select the newly created AMI and click Launch instance from AMI.
- Enter EC2 name, e.g.
app99-demo-win10-ec2. - Select instance type, like
m6a.large. - For key pair, select
Proceed without a key pair. - Select existing security group that was created earlier -
team99-ec2-importdemo-sg. - Select
gp3storage type. - Expand Advanced details, select
team99-ec2-fleet-rolefor IAM instance profile. - (Optional) In user data textbox, enter this.
<script> net user User /active:no net user User Some-Strong-Random-Password-Here net user Administrator /active:yes </script>Notes:
- Windows 10/11 Development Machine comes with user account with no password - username:
Userand the password is not set. AndAdministratoraccount is disabled. - In above user data, we disable
Useraccount, and set a random password of your choosing. - And we also re-enable/activate
Administratoraccount.
- Windows 10/11 Development Machine comes with user account with no password - username:
- Leave the rest as-is, click Launch instance.
- Enter EC2 name, e.g.
-
Once EC2 is ready, click Connect > Session Manager > Connect. This will open session terminal in browser. Enter this to reset password for Administrator.
net user Administrator Some-Strong-Random-Password-Here - Terminate the instance once you are done.
Side Note - Import and launch Windows 11 in AWS EC2
As of Feb 2024, there was an issue importing Windows 11 image.
VHD source: Windows 11 development environment > select VirtualBox.
Importing disk is not progressing beyond 39% after more than 2 hours.
{
    "ImportImageTasks": [
        {
            "Architecture": "x86_64",
            "Description": "Windows 11 Dev",
            "ImportTaskId": "import-ami-016cbb71a3e5795d7",
            "LicenseType": "BYOL",
            "Platform": "Windows",
            "Progress": "39",
            "SnapshotDetails": [
                {
                    "DeviceName": "/dev/sda1",
                    "DiskImageSize": 22724793856.0,
                    "Format": "VMDK",
                    "Status": "completed",
                    "Url": "s3://ec2-import-demo-20240204999999/WinDev2401Eval.ova",
                    "UserBucket": {
                        "S3Bucket": "ec2-import-demo-20240204999999",
                        "S3Key": "WinDev2401Eval.ova"
                    }
                }
            ],
            "Status": "active",
            "StatusMessage": "booting",
            "Tags": [
                {
                    "Key": "CostCenter",
                    "Value": "EC2 Import Demo"
                },
                {
                    "Key": "Department",
                    "Value": "Infra"
                },
                {
                    "Key": "Name",
                    "Value": "win11-ec2-image"
                }
            ],
            "BootMode": "uefi"
        }
    ]
}
And finally after 2-3 hours, it throws the following error.
{
    "ImportImageTasks": [
        {
            "Architecture": "x86_64",
            "Description": "Windows 11 Dev",
            "ImportTaskId": "import-ami-016cbb71a3e5795d7",
            "LicenseType": "BYOL",
            "Platform": "Windows",
            "SnapshotDetails": [
                {
                    "DeviceName": "/dev/sda1",
                    "DiskImageSize": 22724793856.0,
                    "Format": "VMDK",
                    "Status": "completed",
                    "Url": "s3://ec2-import-demo-20240204999999/WinDev2401Eval.ova",
                    "UserBucket": {
                        "S3Bucket": "ec2-import-demo-20240204999999",
                        "S3Key": "WinDev2401Eval.ova"
                    }
                }
            ],
            "Status": "deleted",
            "StatusMessage": "FirstBootFailure: This import request failed because the instance failed to boot and establish network connectivity.",
            "Tags": [
                {
                    "Key": "CostCenter",
                    "Value": "EC2 Import Demo"
                },
                {
                    "Key": "Department",
                    "Value": "Infra"
                },
                {
                    "Key": "Name",
                    "Value": "win11-ec2-image"
                }
            ],
            "BootMode": "uefi"
        }
    ]
}